
This section outlines how to configure the system to restrict public access to specific pages and functionality by requiring user authentication.
Sign-In Page
The creation of a sign-in page is required to enable access to restricted pages within the portal.
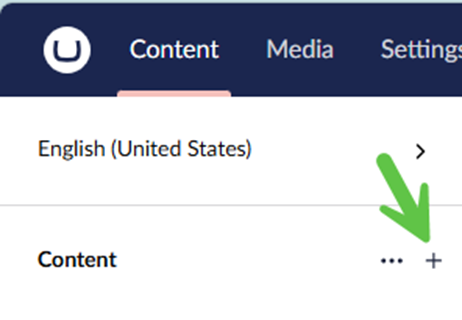
Step 1 – Add a login page.
a) From the Content folder, click the ‘+’ and then select the “Login Page” content item.
Step 2 – Configure the login page.
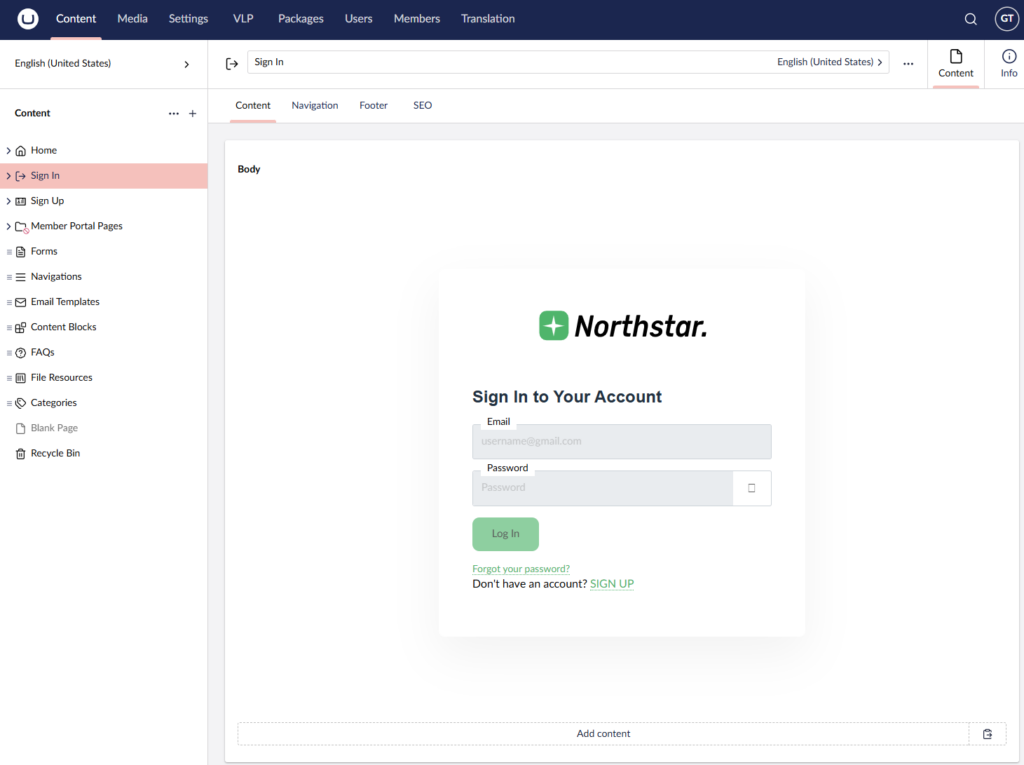
a) Give the page a meaningful name such as “Sign In”.
b) In the page Body, click Add content.
c) Select the “Login” widget.
d) Configure the settings within the Content section. If the pages required for these configuration options have not yet been created, you can return to this configuration page later to complete the setup.
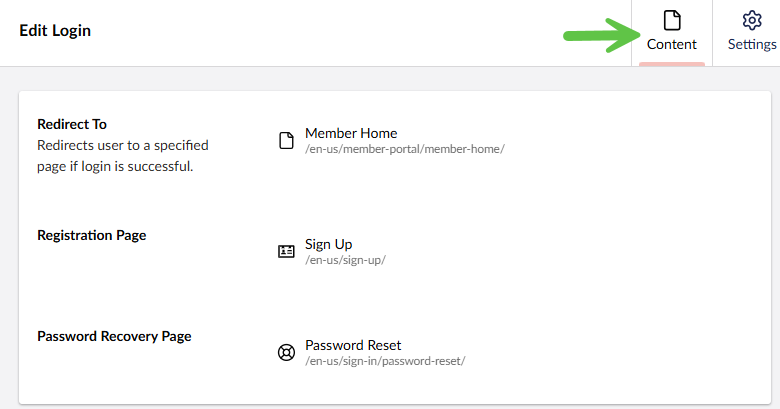
| Redirect To | Redirects the user to a specified page if the login is successful. The selected page is generally the landing page of the portal. |
| Registration Page | Redirects the user to a specified page that has the Registration widget. Note: if this is not configured then the “Sign Up” link on the Login widget is not displayed. |
| Password Recovery Page | Redirects the user to the specified page where the Password Recovery widget has been configured. Note: This page is created in the next step below. |
e) Click Save or Save and Publish.
The end result should resemble this:
Password Reset Page
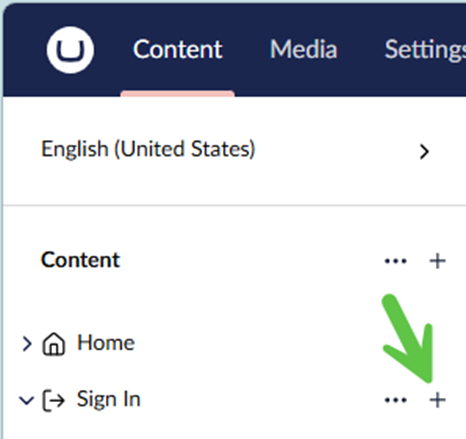
Step 1 – Add a password reset page.
a) From the Sign In page (created in the previous section), click the ‘+’ and then add a new “Password Reset Page” content item.
Step 2 – Configure the new Password Reset page.
a) Give the page a meaningful name such as “Password Reset”
b) In the page Body, click Add content.
c) Select the “Password Recovery” widget”.
d) Configure the settings. If the Email Templates have not yet been created, you can return to this configuration page later to complete the setup.
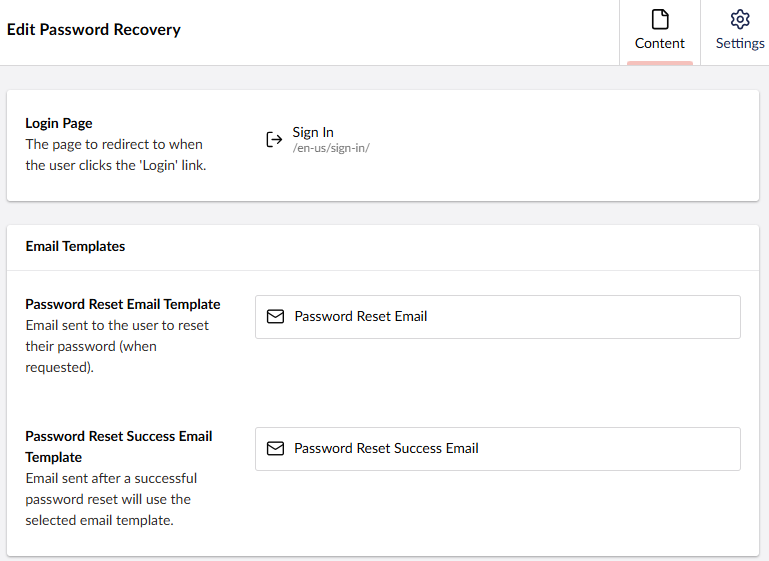
| Login Page | Redirects the user to the specified Login page when they click the “Log In ” link. Select the Sign In page created in the steps above. Note: If this is not configured then the “Log In” link on the Password Reset widget is not displayed. |
| Password Reset Email Template | The template used when sending an email to a user when they have requested their password. |
| Password Reset Success Email Template | The template used to send a user an email when their password has been successfully changed. |
e) Click Create to create the page.
f) Click Save or Save and Publish.
g) Return to the Sign In Page configuration (above) and update the “Password Recovery Page” link to point to the Password Reset page that was just created. (Don’t forget to Save and Publish the change!)
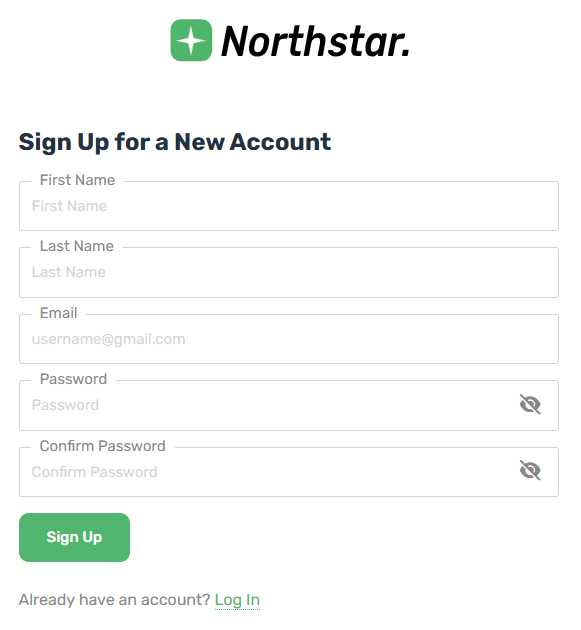
Registration (Sign-up) Page
A registration page is optional and is only required if the portal allows public users to self-register.
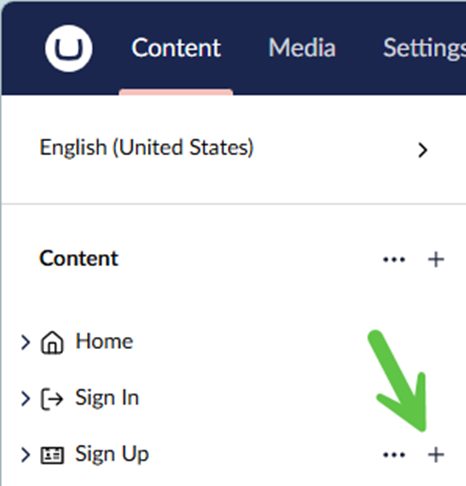
Step 1 – Create a Registration page.
a) From the Content folder, click the ‘+’ and then add a new “Registration Page” content item.

Step 2 – Configure the new registration page.
a) Give the page a meaningful name such as “Sign Up”
b) In the page Body, click Add content.
c) Select the Registration widget.
d) Configure the settings. If any of the pages or Email Templates have not yet been created, you can return to this configuration page later to complete the setup.
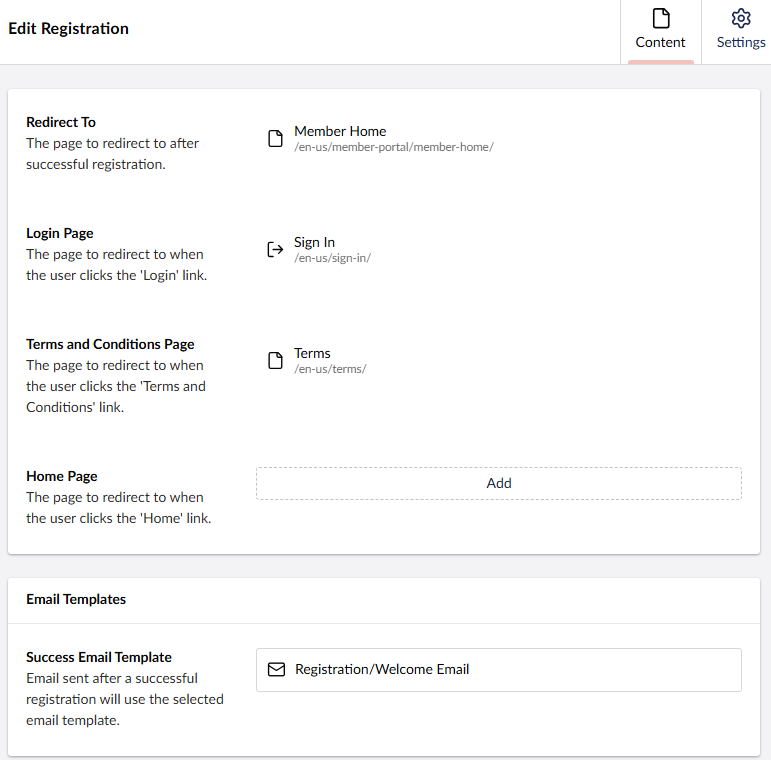
| Redirect To | Redirects the user to the selected page after a successful registration. |
| Login Page | Redirects the user to the selected page when the “Login” link is clicked. Note: If this is not configured then the “Log In” link is not displayed. |
| Terms and Conditions Page | Redirects the user to the selected page when the “Terms & Conditions” link is clicked. Note: If this is not configured then the terms and conditions massage and link are not displayed. |
| Home Page | Redirects the user to the selected page with the home link is clicked (In some scenarios, the Logo). |
| Success Email Template | The template used to send a user an email when the registration is successful. |
e) Click Create to create the page.
f) Click Save or Save and Publish.
g) Return to the Sign In page configuration and update the “Registration Page” link to point to the Registration page that was just created. (Don’t forget to Save and Publish the change!)
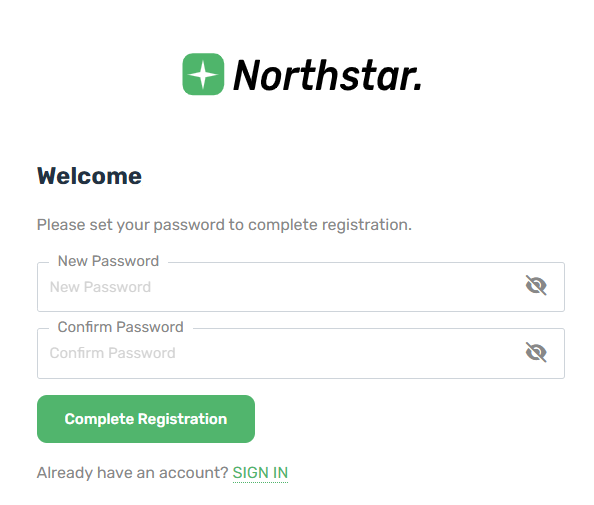
Invitation Page
The Invitation page is the page users are directed to when responding to an email invitation to create their password and complete the registration process.
Step 1 – Create An Invitation page.
a) From the Registration page created above, click the ‘+’ and then add a new “Invitation Page” content item.
Step 2 – Configure the new Invitation page.
a) Give the page a meaningful name such as “Invitation”
b) In the page Body, click Add content.
c) Select the “Member Invitation” widget.
d) Configure the settings. If any of the pages or Email Templates have not yet been created, you can return to this configuration page later to complete the setup.
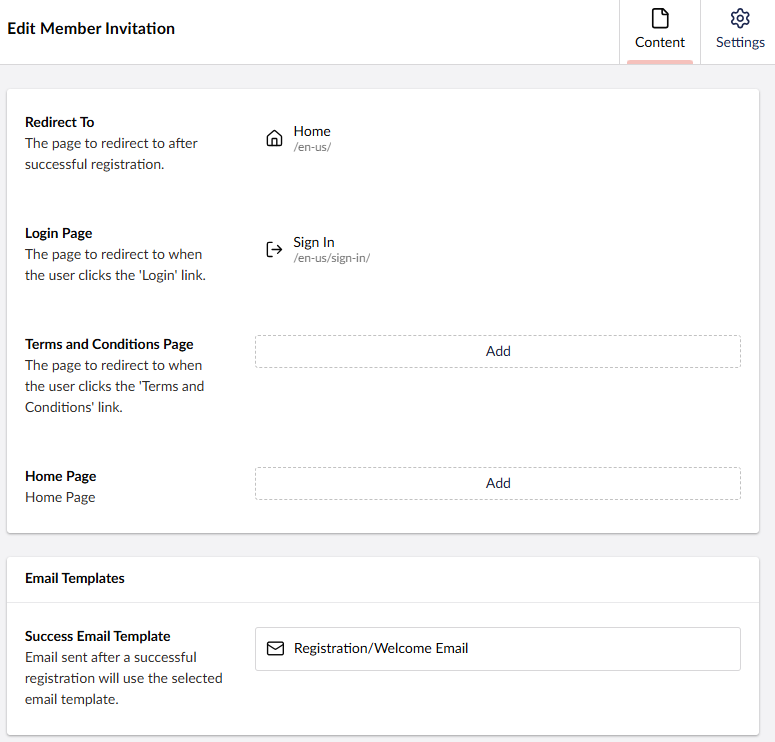
| Redirect To | Redirects the user to the selected page after a successful registration. |
| Login Page | Redirects the user to the selected page when the “Login” link is clicked. Note: If this is not configured then the “Log In” link is not displayed. |
| Terms and Conditions Page | Redirects the user to the selected page when the “Terms & Conditions” link is clicked. Note: If this is not configured then the terms and conditions massage and link are not displayed. |
| Home Page | Redirects the user to the selected page with the home link is clicked (In some scenarios, the Logo). |
| Success Email Template | The template used to send a user an email when the registration is successful. |
f) Click Create to create the page.
g) Click Save or Save and Publish.
Restricted Content Group
This section outlines how to configure content section where pages can be created and restricted from public access.
Step 1 – Add a new Content Group page.
a) From the Content folder, click the ‘+’ and then add a new “Content Group” content item.

Step 2 – Configure the new Content Group to restrict access to specific Member Groups.
a) Give the Content Group a meaningful name such as “Member Portal Pages”.
b) Click Save or Save and Publish.
c) Select “Public Access”.
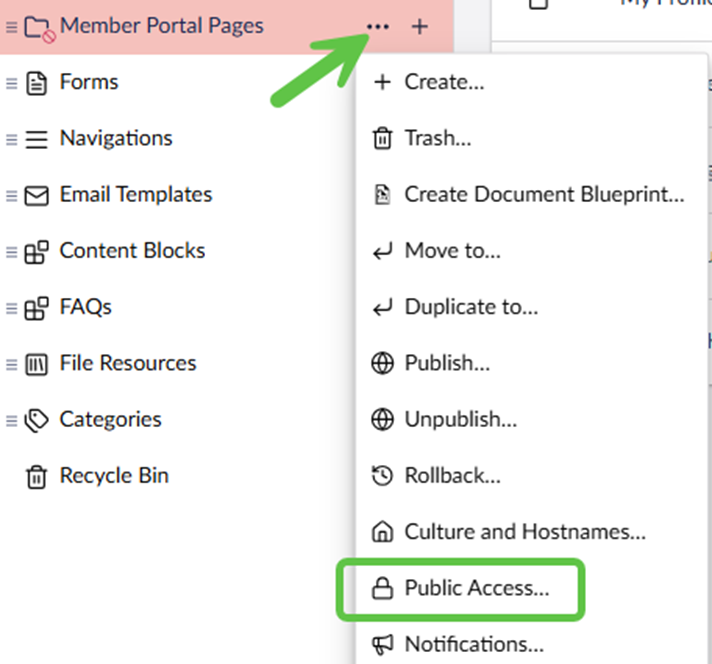
d) Configure the Public Access settings.
Select the groups who have access to the restricted pages by choosing the appropriate member group.
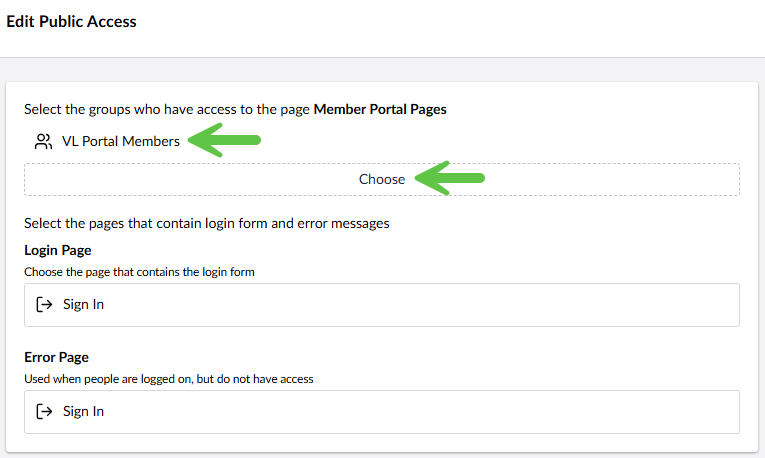
| Login Page | Indicates the page to redirect to when authentication is needed. |
| Error Page | Indicates the page to redirect to when access to restricted content is denied. |
e) Click Edit save the changes to the Public Access configuration.
Step 3 – Configure advanced features.
These are the advanced configuration settings.
| General –> Configuration –>Redirect To | Redirects authenticate user to a chosen page. By default, the user gets redirected to the first child page of the restricted content group. |
| Navigation –> Hide in Navigation | Indicates if the page must be hidden in all navigation menus. |
| Navigation –>Icon | A custom icon to display in a navigation menu item (a template for the navigation must support this icon to be visible). |
| Navigation –> Navigation Widget Overrides –> Main Navigation | If the navigation control is selected here it will be replaced for the page and all of its descendants. By default the navigation control is taken from the ascendants and if those are empty from the “Home Page”. |
| Navigation –>Navigation Widget Overrides –> URL Segment Name | Overrides a segment name of the URL for this page. If the segment name is not specified, the published name of the page will be used. |
Be sure to Save or Save and Publish after making changes.
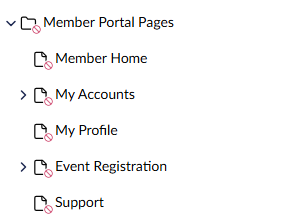
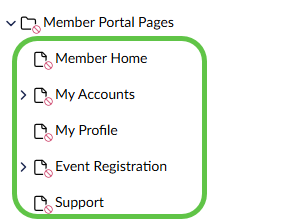
Adding Restricted Child Pages
This section outlines how to create pages that are restricted from public access. Any pages created under the restricted content group (created above) will inherit the same restrictions.
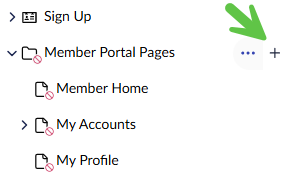
Step 1 – Create a new child page.
a) From the Restricted Content Group, click the ‘+’ and then add a new “Page” content item.
Step 2 – Configure the new page.
a) Give the page a meaningful name such as “Member Home”.
b) In the page Body, click Add content and configure your page as needed using the various widgets.
c) When finished designing the page click Save or Save and Publish.
PRO TIP: Pages can be created in a hierarchy by adding them at the page level.
IMPORTANT - If the “Redirect To” link was not configured during the initial creation of the Sign In page, then be sure to set this after creating the landing/home page for restricted portal pages.